| .. | ||
| assists.md | ||
| features.md | ||
| README.md | ||
The main interface to rust-analyzer is the
LSP implementation. To
install lsp server, clone the repository and then run cargo xtask install --server (which is shorthand for cargo install --path ./crates/ra_lsp_server). This will produce a binary named ra_lsp_server which
you should be able to use it with any LSP-compatible editor. We use custom
extensions to LSP, so special client-side support is required to take full
advantage of rust-analyzer. This repository contains support code for VS Code
and Emacs.
$ git clone git@github.com:rust-analyzer/rust-analyzer && cd rust-analyzer
$ cargo xtask install --server
Rust Analyzer needs sources of rust standard library to work, so you might also need to execute
$ rustup component add rust-src
See ./features.md document for a list of features that are available.
VS Code
Prerequisites:
In order to build the VS Code plugin, you need to have node.js and npm with a minimum version of 10 installed. Please refer to node.js and npm documentation for installation instructions.
You will also need the most recent version of VS Code: we don't try to maintain compatibility with older versions yet.
Installation from prebuilt binaries
We ship prebuilt binaries for Linux, Mac and Windows via GitHub releases. In order to use them you need to install the client VSCode extension.
Publishing to VSCode marketplace is currently WIP. Thus you need to clone the repository and install only the client extension via
$ git clone https://github.com/rust-analyzer/rust-analyzer.git --depth 1
$ cd rust-analyzer
$ cargo xtask install --client-code
Then open VSCode (or reload the window if it was already running), open some Rust project and you should see an info message pop-up.
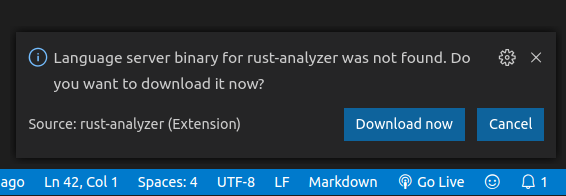
Click Download now, wait untill the progress is 100% and you are ready to go.
For updates you need to remove installed binary
rm -rf ${HOME}/.config/Code/User/globalStorage/matklad.rust-analyzer
"Donwload latest language server" command for VSCode and automatic updates detection is currently WIP.
Installation from sources
The experimental VS Code plugin can then be built and installed by executing the following commands:
$ git clone https://github.com/rust-analyzer/rust-analyzer.git --depth 1
$ cd rust-analyzer
$ cargo xtask install
The automatic installation is expected to just work for common cases, if it doesn't, report bugs!
Note #1831: If you are using the popular
Vim emulation plugin, you will likely
need to turn off the rust-analyzer.enableEnhancedTyping setting.
(// TODO: This configuration is no longer available, enhanced typing shoud be disabled via removing Enter key binding, see this issue)
If you have an unusual setup (for example, code is not in the PATH), you
should adapt these manual installation instructions:
$ git clone https://github.com/rust-analyzer/rust-analyzer.git --depth 1
$ cd rust-analyzer
$ cargo install --path ./crates/ra_lsp_server/ --force --locked
$ cd ./editors/code
$ npm install
$ npm run package
$ code --install-extension ./rust-analyzer-0.1.0.vsix
It's better to remove existing Rust plugins to avoid interference.
Beyond basic LSP features, there are some extension commands which you can invoke via Ctrl+Shift+P or bind to a shortcut. See ./features.md for details.
For updates, pull the latest changes from the master branch, run cargo xtask install again, and restart VS Code instance.
See microsoft/vscode#72308 for why a full restart is needed.
VS Code Remote
You can also use rust-analyzer with the Visual Studio Code Remote extensions
(Remote SSH, Remote WSL, Remote Containers). In this case, however, you have to
manually install the .vsix package:
- Build the extension on the remote host using the instructions above (ignore the
error if
codecannot be found in your PATH: VSCode doesn't need to be installed on the remote host). - In Visual Studio Code open a connection to the remote host.
- Open the Extensions View (
View > Extensions, keyboard shortcut:Ctrl+Shift+X). - From the top-right kebab menu (
···) selectInstall from VSIX... - Inside the
rust-analyzerdirectory find theeditors/codesubdirectory and choose therust-analyzer-0.1.0.vsixfile. - Restart Visual Studio Code and re-establish the connection to the remote host.
In case of errors please make sure that ~/.cargo/bin is in your PATH on the remote
host.
Settings
rust-analyzer.highlightingOn: enables experimental syntax highlighting. Colors can be configured viaeditor.tokenColorCustomizations. As an example, Pale Fire color scheme tweaks rust colors.rust-analyzer.enableEnhancedTyping: by default, rust-analyzer intercepts theEnterkey to make it easier to continue comments. Note that it may conflict with VIM emulation plugin.rust-analyzer.raLspServerPath: path tora_lsp_serverexecutablerust-analyzer.enableCargoWatchOnStartup: prompt to install & enablecargo watchfor live error highlighting (note, this does not use rust-analyzer)rust-analyzer.excludeGlobs: a list of glob-patterns for exclusion (see globset docs for syntax). Note: glob patterns are applied to all Cargo packages and a rooted at a package root. This is not very intuitive and a limitation of a current implementation.rust-analyzer.useClientWatching: use client provided file watching instead of notify watching.rust-analyzer.cargo-watch.command:cargo-watchcommand. (e.g:clippywill run ascargo watch -x clippy)rust-analyzer.cargo-watch.arguments: cargo-watch check arguments. (e.g:--features="shumway,pdf"will run ascargo watch -x "check --features="shumway,pdf"")rust-analyzer.cargo-watch.ignore: list of patterns for cargo-watch to ignore (will be passed as--ignore)rust-analyzer.trace.server: enables internal loggingrust-analyzer.trace.cargo-watch: enables cargo-watch loggingRUST_SRC_PATH: environment variable that overwrites the sysrootrust-analyzer.featureFlags-- a JSON object to tweak fine-grained behavior:{ // Show diagnostics produced by rust-analyzer itself. "lsp.diagnostics": true, // Automatically insert `()` and `<>` when completing functions and types. "completion.insertion.add-call-parenthesis": true, // Enable completions like `.if`, `.match`, etc. "completion.enable-postfix": true, // Show notification when workspace is fully loaded "notifications.workspace-loaded": true, // Show error when no Cargo.toml was found "notifications.cargo-toml-not-found": true, }
Emacs
Prerequisites:
emacs-lsp, dash and ht packages.
Installation:
- add
rust-analyzer.el
to load path and require it in
init.el - run
lspin a rust buffer - (Optionally) bind commands like
rust-analyzer-join-lines,rust-analyzer-extend-selectionandrust-analyzer-expand-macroto keys, and enablerust-analyzer-inlay-hints-modeto get inline type hints
Vim and NeoVim (coc-rust-analyzer)
- Install coc.nvim by following the instructions at coc.nvim (nodejs required)
- Run
:CocInstall coc-rust-analyzerto install coc-rust-analyzer, this extension implements most of the features supported in the VSCode extension:- same configurations as VSCode extension,
rust-analyzer.raLspServerPath,rust-analyzer.enableCargoWatchOnStartupetc. - same commands too,
rust-analyzer.analyzerStatus,rust-analyzer.startCargoWatchetc. - highlighting and inlay_hints are not implemented yet
- same configurations as VSCode extension,
Vim and NeoVim (LanguageClient-neovim)
-
Install LanguageClient-neovim by following the instructions here
- The github project wiki has extra tips on configuration
-
Configure by adding this to your vim/neovim config file (replacing the existing rust specific line if it exists):
let g:LanguageClient_serverCommands = {
\ 'rust': ['ra_lsp_server'],
\ }
NeoVim (nvim-lsp)
NeoVim 0.5 (not yet released) has built in language server support. For a quick start configuration
of rust-analyzer, use neovim/nvim-lsp.
Once neovim/nvim-lsp is installed, use lua require'nvim_lsp'.rust_analyzer.setup({}) in your init.vim.
Sublime Text 3
Prequisites:
LSP package.
Installation:
- Invoke the command palette with Ctrl+Shift+P
- Type
LSP Settingsto open the LSP preferences editor - Add the following LSP client definition to your settings:
"rust-analyzer": {
    "command": ["ra_lsp_server"],
    "languageId": "rust",
    "scopes": ["source.rust"],
    "syntaxes": [
        "Packages/Rust/Rust.sublime-syntax",
        "Packages/Rust Enhanced/RustEnhanced.sublime-syntax"
    ],
    "initializationOptions": {
      "featureFlags": {
      }
    },
}
- You can now invoke the command palette and type LSP enable to locally/globally enable the rust-analyzer LSP (type LSP enable, then choose either locally or globally, then select rust-analyzer)
Setting up the PATH variable
On Unix systems, rustup adds ~/.cargo/bin to PATH by modifying the shell's
startup file. Depending on your configuration, your Desktop Environment might not
actually load it. If you find that rust-analyzer only runs when starting the
editor from the terminal, you will have to set up your PATH variable manually.
There are a couple of ways to do that:
- for Code, set
rust-analyzer.raLspServerPathto~/.cargo/bin(the~is automatically resolved by the extension) - copy the binary to a location that is already in
PATH, e.g./usr/local/bin - on Linux, use PAM to configure the
PATHvariable, by e.g. puttingPATH DEFAULT=/usr/local/bin:/usr/bin:/usr/local/sbin:/usr/sbin:@{HOME}/.cargo/bin:@{HOME}/.local/binin your~/.pam_environmentfile; note that this might interfere with other defaults set by the system administrator via/etc/environment.